The Prince of Wales Theatre is a renowned West End venue, offering a historic and intimate setting for world-class productions․ With a seating capacity of around 1,100, it provides an exceptional viewing experience across its four seating levels: Stalls, Dress Circle, Upper Circle, and Balcony․ This guide will help you navigate the theatre’s seating layout to ensure an unforgettable visit․
1․1 Overview of the Theatre’s History
The Prince of Wales Theatre, located in London’s West End, has a rich history dating back to its opening in 1937․ Designed by architect Robert Cromie, it originally featured a striking Art Deco style․ Over the years, the theatre has hosted numerous iconic productions, showcasing its versatility and charm․ Its historic significance and intimate design make it a beloved venue for both performers and audiences, offering a unique setting for unforgettable theatrical experiences․
1․2 Importance of Understanding the Seating Layout
Understanding the seating layout of the Prince of Wales Theatre is crucial for an optimal experience․ It helps patrons make informed decisions about seat selection, ensuring they enjoy unobstructed views and comfort․ Knowing the layout aids in planning visits, especially for large groups or special occasions․ It also allows visitors to balance preferences with budget, as different areas offer varying vantage points and price ranges․ This knowledge enhances overall satisfaction and helps avoid potential disappointments during the performance․
General Seating Layout of the Prince of Wales Theatre
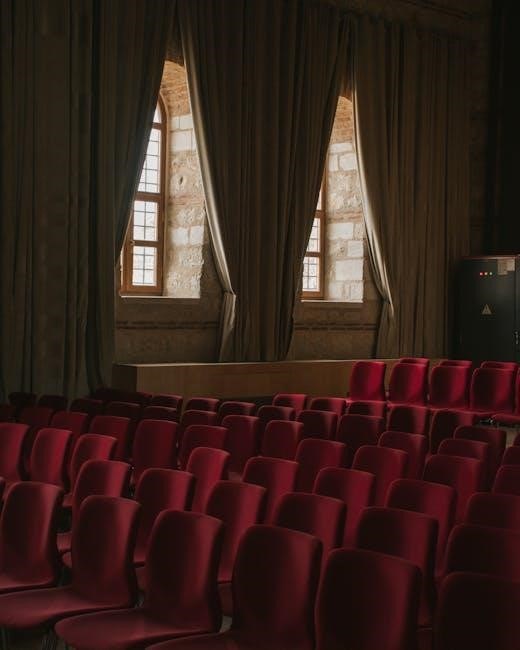
The Prince of Wales Theatre features a traditional four-tier layout with Stalls, Dress Circle, Upper Circle, and Balcony, each offering distinct views and price points․
2․1 Main Seating Areas
The Prince of Wales Theatre features four primary seating areas: the Stalls, Dress Circle, Upper Circle, and Balcony․ Each level offers a unique perspective of the stage, catering to different preferences and budgets․ The Stalls provide an intimate experience close to the action, while the Dress Circle and Upper Circle offer elevated views․ The Balcony, though furthest from the stage, provides a panoramic overview․ These areas are designed to ensure an immersive theatrical experience for all audiences․
2․2 Key Differences Between Seating Levels
The seating levels at the Prince of Wales Theatre vary significantly in proximity, view, and comfort․ The Stalls offer the closest and most immersive experience, while the Dress Circle provides excellent visibility with a slight elevation․ The Upper Circle is higher, offering a broader perspective but with less detail․ The Balcony, furthest from the stage, delivers a panoramic view but may lack intimacy․ Each level balances distance, detail, and price, catering to diverse audience preferences and budgets․

Detailed Guide to Stalls Seating
The Stalls offer an immersive experience, being the closest seating area to the stage․ Seats are arranged on a flat floor, providing excellent proximity to the performance․
3․1 Best Seats in the Stalls
The best seats in the Stalls are typically in the central rows (3-7), offering an unobstructed and immersive view of the performance․ These seats provide excellent proximity to the stage, allowing audiences to fully engage with the show․ Avoid seats too close to the stage, as they may cause neck strain, and opt for aisle seats if legroom is a priority․ Always check the theatre’s seating plan to ensure your chosen seat avoids any obstructions like railings or pillars․ Booking early is key, as these popular seats sell out quickly․
3․2 Tips for Choosing Stalls Seats
When selecting Stalls seats, prioritize central positions for the best view․ Avoid the first few rows to prevent neck strain from looking upwards․ Consider seats closer to the aisle for easier access and more legroom․ Check the seating plan to ensure no obstructions, like railings, are in your line of sight․ Booking in advance is crucial, as Stalls seats are highly sought after․ Balance proximity to the stage with comfort for an optimal experience․
3․3 Price Range for Stalls Tickets
The price range for Stalls tickets varies depending on the show’s demand and seat location․ Central seats near the stage are the most expensive, often starting from £60-£80․ Slightly further back or towards the aisles may cost £40-£60․ Prices increase for popular performances and weekends․ Check the theatre’s box office or official ticketing websites for the most accurate pricing․ Booking in advance can secure better deals, especially for mid-week shows․

Dress Circle Seating Guide
The Dress Circle offers a prime view, one level above the Stalls, providing excellent visibility and acoustics․ It is ideal for those seeking a elevated perspective․
4․1 Optimal Viewing in the Dress Circle
The Dress Circle at the Prince of Wales Theatre offers excellent sightlines, with a clear view of the entire stage․ Central seats provide the most immersive experience, while rear seats still offer a panoramic perspective․ Avoid extreme side seats for the best visual clarity․ The elevation enhances the visual impact without feeling too distant, making it ideal for appreciating both intricate performances and grand productions․
4․2 Factors to Consider When Selecting Dress Circle Seats
When choosing Dress Circle seats, consider proximity to the stage and aisle access for comfort․ Avoid seats behind pillars or at sharp angles for unobstructed views․ The rake of the seating ensures good visibility, but rear seats may feel slightly distant․ Budget and personal preference for legroom or centrality also play a role․ Check the theatre’s seating plan and reviews to make an informed decision, ensuring a balance between view quality and price․
4․3 Cost of Dress Circle Tickets
Dress Circle tickets at the Prince of Wales Theatre vary in price, typically ranging from £50 to £100 or more, depending on the show’s demand and seating location․ Central seats generally cost more than those on the sides․ Prices may also fluctuate based on the day of the week and time of year․ Check the theatre’s official website or authorized ticket vendors for the most accurate and up-to-date pricing information․

Upper Circle Seating Overview
The Upper Circle offers elevated seating with a panoramic view of the stage, though farther from the action․ Its high ceiling enhances acoustic quality, ensuring crisp sound․
5․1 Recommended Seats in the Upper Circle
The best seats in the Upper Circle are centrally located, offering an excellent view of the stage․ Rows A to G provide good proximity, while seats A to G in the center ensure an unobstructed view․ Avoid seats toward the rear or extreme sides to maintain visibility․ Opting for lower-numbered rows enhances the overall experience․ Booking in advance is advisable, as popular shows fill up quickly, making these seats highly sought after among theatergoers․
5․2 Advantages and Disadvantages of Upper Circle Seats
The Upper Circle offers a panoramic view of the stage, ideal for appreciating grand musicals․ Seats are generally more affordable than lower levels․ However, the higher elevation can make the stage feel distant, and some seats may have obstructed views due to safety rails or pillars․ Legroom and comfort vary, with some rows offering less space․ While it provides a unique perspective, it may not suit those seeking an immersive experience․ Accessibility can also be a challenge due to stairs, though some theatres offer elevators․ Ultimately, it’s a budget-friendly option for those who value a broader view but may compromise on intimacy and comfort․
5․3 Pricing for Upper Circle Tickets
Upper Circle tickets at the Prince of Wales Theatre are generally more affordable, starting from around £20-£30 for standard performances․ Prices increase for premium shows or peak times, reaching up to £50․ Discounts may be available for off-peak performances or special promotions․ It’s advisable to check the theatre’s official box office or authorized ticket sellers for the most accurate pricing and availability․ This ensures a cost-effective option for enjoying a show without compromising on the overall experience․
Balcony Seating Information
The balcony offers a panoramic view of the stage, ideal for large-scale productions․ It’s the highest seating level, providing a unique perspective․ Budget-friendly option․
6․1 Best Seats in the Balcony
The best seats in the balcony are centrally located, offering an unobstructed view of the stage․ Rows closer to the front provide a more immersive experience․ Avoid edge seats or those behind pillars, as they may have restricted views․ Central seats in the middle rows strike a balance between visibility and comfort, ensuring an enjoyable performance without obstructions․
6․2 Things to Keep in Mind When Booking Balcony Seats
When booking balcony seats, consider the height and potential obstructions like pillars or safety rails․ Check the theatre’s seating plan to avoid restricted views․ Legroom may be limited in balcony seats, so prioritize comfort if needed․ Be aware that sound and visual details may be less vivid due to the distance․ ensure to review the theatre’s accessibility features if required․ Lastly, compare prices and availability to secure the best option for your preferences and budget․
6․3 Balcony Ticket Prices
Balcony ticket prices at the Prince of Wales Theatre vary depending on the performance and seating location․ Generally, prices range from £20 to over £50, with restricted view seats often being the most affordable․ Premium seats offering better views may cost significantly more․ Weekday matinees tend to be cheaper than evening or weekend shows․ Check the theatre’s official website or authorized ticket sellers for the most accurate and up-to-date pricing information before booking․
Accessible Seating Options
The Prince of Wales Theatre offers accessible seating for patrons with disabilities, including wheelchair spaces and companion seats․ Facilities like accessible entrances and restrooms are available․
7․1 Availability of Accessible Seats
Accessible seats at the Prince of Wales Theatre are primarily located in the Stalls, near aisle seats for ease of access․ Availability is limited, and these seats are allocated on a first-come, first-served basis․ It is advisable to book accessible seats well in advance to ensure availability․ The theatre also offers companion seating options for patrons with disabilities․ These seats can be booked online or via phone, ensuring equal access to all performances․
7․2 Facilities for Patrons with Disabilities
The Prince of Wales Theatre offers various facilities for patrons with disabilities, ensuring an inclusive experience․ Wheelchair-accessible entrances and lifts are available, connecting all levels of the theatre․ Accessible toilets are located on each floor, and hearing loops are installed in the auditorium for those with hearing impairments․ Trained staff are on hand to assist patrons with disabilities․ Guide dogs are also welcome, and select performances offer sign language interpretation․
These facilities ensure that all visitors can enjoy performances comfortably and equally․ Advance booking is recommended to confirm accessibility needs․

Special Seating Options
The Prince of Wales Theatre offers exclusive seating options, including VIP packages, premium seats, and box seats, providing enhanced comfort, amenities, and unique perspectives for attendees․
8․1 VIP and Premium Seating
The Prince of Wales Theatre offers exclusive VIP and premium seating options, providing an enhanced theatrical experience․ These seats are typically located in prime areas, such as the center stalls or dress circle, ensuring excellent views of the stage․ VIP packages often include access to the theatre’s luxurious lounges, priority entry, and personalized service․ Premium seats may also come with complimentary amenities like interval drinks or programmes․ These options are ideal for special occasions, offering a blend of comfort and exclusivity․ Prices for VIP and premium seating are higher, reflecting the added benefits and superior location․
8․2 Box Seats and Their Benefits
Box seats at the Prince of Wales Theatre offer a unique and intimate viewing experience․ Positioned on either side of the auditorium, they provide a distinct perspective of the stage․ These seats are often sought after for their privacy and proximity to the action, especially in the lower levels․ While they may not offer a direct center view, they compensate with a sense of exclusivity and comfort․ Box seats are particularly popular for smaller groups or couples looking to enhance their theatrical experience;
8․3 Restricted View Seats
Restricted view seats at the Prince of Wales Theatre are located in areas where the stage is partially obstructed․ Common obstructions include pillars, safety rails, or parts of the stage setup․ While these seats are often cheaper, they may limit your overall viewing experience․ They are best suited for budget-conscious attendees who want to enjoy the show but don’t mind a compromised view․ Always check the specific view before booking to ensure it meets your expectations․

Comparing Seating Areas
Comparing seating areas at the Prince of Wales Theatre helps identify the best options based on proximity, view quality, and budget․
9․1 Stalls vs․ Dress Circle
The Stalls offer an intimate experience with close proximity to the stage, ideal for immersive performances․ The Dress Circle provides a elevated view, often considered better for overall visual appreciation․ Stalls may lack some stage elements due to angle, while the Dress Circle offers a broader perspective․ Comfort and legroom vary between areas, influencing preference․ Both areas are popular, catering to different viewer priorities and budgets․
9․2 Upper Circle vs․ Balcony
The Upper Circle and Balcony differ significantly in view quality and comfort․ The Upper Circle offers a higher elevation, providing a panoramic view, though some seats may have obstructed sightlines․ The Balcony, being the highest level, often has the most restricted views but is the most affordable option․ While the Upper Circle is preferable for a decent view, the Balcony is better suited for those prioritizing budget over visibility․ Choose based on your preference for view quality versus cost;
Tips for Booking the Best Seats
Plan ahead, use the theatre’s seating plan, and consider last-minute options․ Prioritize central seats for optimal views․ Check availability and prices regularly for the best deals․
10․1 Planning Your Visit in Advance
Booking early is crucial for popular shows at the Prince of Wales Theatre․ Check the performance schedule and secure tickets well in advance to ensure availability․ Popular shows often sell out quickly, so planning ahead guarantees better seat selection․ Additionally, consider the theatre’s location and plan your travel to arrive on time․ Early booking also helps avoid higher prices, ensuring a smoother and more enjoyable experience for theatre-goers․
10․2 Using the Theatre’s Seating Plan
Familiarizing yourself with the Prince of Wales Theatre’s seating plan is essential for making informed decisions․ The plan details seating areas, including stalls, dress circle, upper circle, and balcony․ It highlights seat numbers, rows, and proximity to the stage․ Check for obstructions or restricted views․ Comparing prices across sections helps budgeting․ Use the theatre’s official website or box office for the most accurate and up-to-date seating layout to ensure a seamless booking process and optimal viewing experience․
10․3 Last-Minute Booking Strategies
Last-minute booking requires flexibility and quick decision-making․ Check the theatre’s website for real-time availability and special offers․ Use ticketing apps or sign up for alerts to catch last-minute deals․ Consider less popular performance times or seats with partial views for lower prices․ Be prepared to act fast, as availability changes rapidly․ Contact the box office directly for any last-minute returns or cancellations, which may offer unexpected opportunities to secure great seats at discounted rates․
Common Mistakes to Avoid
Common mistakes include rushing seat selection without checking the view, ignoring seat numbers, and not considering personal comfort or accessibility needs when booking․
11․1 Choosing Seats Without Checking the View
Choosing seats without checking the view is a common mistake․ Some seats may have obstructed views due to pillars or safety rails․ Always consult the theatre’s seating plan to ensure unobstructed sightlines, especially in the Upper Circle and Balcony․ Additionally, certain seats may offer side views or restricted angles, which can detract from the overall experience․ It’s crucial to verify the view before booking to avoid disappointment․ Higher prices don’t always guarantee better visibility, so research is key to making an informed decision․ This ensures an enjoyable and unobstructed viewing experience at the Prince of Wales Theatre․
11․2 Ignoring Theatre Layout When Booking
Ignoring the theatre layout when booking can lead to a disappointing experience․ The Prince of Wales Theatre has distinct seating areas, each with unique characteristics․ Failing to understand the layout may result in seats that are too far from the stage, obstructed views, or an unsuitable vantage point․ Always refer to the seating plan to familiarize yourself with the venue’s design․ This ensures you select seats that align with your preferences and enhances your overall enjoyment of the performance․
12․1 Summary of Key Points
The Prince of Wales Theatre offers a variety of seating options, each with unique benefits․ Stalls provide intimacy, while the Dress Circle and Upper Circle offer excellent views․ Balcony seats are budget-friendly but distant․ Accessible seating ensures inclusivity, and VIP options enhance the experience․ Consider view, comfort, and budget when choosing seats․ Plan ahead, use the seating plan, and avoid last-minute mistakes․ By understanding the layout, you can select the perfect seats for an unforgettable performance․
12․2 Final Tips for an Enjoyable Experience
To maximize your enjoyment at the Prince of Wales Theatre, arrive early to soak in the atmosphere․ Check for any bag restrictions and plan your interval drink in advance․ Stay present by minimizing phone use and engage fully with the performance․ Be mindful of noise levels and respect fellow patrons․ Follow staff instructions for a smooth experience․ These tips ensure a memorable and stress-free visit to the theatre․