
The Eaton Endurant Service Manual is a comprehensive guide for technicians and operators, detailing installation, maintenance, and repair procedures for HD, XD, Pro, and UltraShift models․
1․1 Overview of the Eaton Endurant Transmission
The Eaton Endurant Transmission is a high-performance, 12-speed automated transmission designed for on-highway applications․ Known for its efficiency, durability, and lightweight design, it offers versatile solutions for various trucking needs․ The Endurant series includes HD, XD, Pro, and UltraShift PLUS models, each tailored for specific operational demands․ Its advanced features ensure smooth shifting, optimal fuel efficiency, and reduced wear on components․ The transmission is widely used in heavy-duty vehicles, making it a reliable choice for long-haul and vocational applications․ Its modular design enhances serviceability, aligning with the detailed guidance provided in the service manual․
1․2 Key Features of the Endurant HD, XD, Pro, and UltraShift PLUS Models
The Endurant HD, XD, Pro, and UltraShift PLUS models offer distinct features tailored for different applications․ The HD model is lightweight and efficient, ideal for on-highway use, while the XD provides enhanced durability for demanding vocational settings․ The Pro model balances performance and efficiency, making it suitable for mixed applications․ UltraShift PLUS integrates advanced automation for smoother shifting and improved fuel economy․ Each model features advanced clutch technology, optimized gear ratios, and intelligent controls to enhance driver comfort and vehicle performance․ These models are designed to meet the diverse needs of modern trucking operations, ensuring reliability and efficiency in various driving conditions;
1․3 Importance of the Service Manual for Maintenance and Repair
The Eaton Endurant Service Manual is essential for ensuring proper maintenance and repair of the transmission․ It provides detailed procedures for oil drain, torque specifications, and fluid recommendations, critical for maintaining optimal performance․ The manual includes troubleshooting guides to identify common issues like gear slippage and fluid leaks, along with diagnostic tools and error codes for precise repairs․ By following OEM guidelines, technicians can avoid component damage and ensure safety․ Regular maintenance, as outlined in the manual, extends the transmission’s lifespan and prevents costly repairs․ It serves as a vital resource for technicians to service and repair Endurant transmissions effectively․

General Information and Safety Precautions
The manual emphasizes critical safety measures, including pressure ranges (60-140 PSI) and OEM guidelines to prevent damage or injury․ Proper tool usage and towing precautions are highlighted․
2․1 Warnings and Cautions for Transmission Service
The Eaton Endurant Service Manual emphasizes critical safety measures to prevent injury or damage․ Warnings include proper handling of transmission components, adhering to pressure ranges (60-140 PSI), and avoiding over-torqueing drain plugs․ Cautions highlight the importance of disconnecting the battery before servicing the TCM and ensuring the vehicle is properly secured during towing․ Failure to follow OEM guidelines may result in severe injury or transmission damage․ Always use approved tools and refer to specific torque specifications to ensure safe and effective servicing․ Proper precautions protect both the technician and the equipment․
2․2 Proper Use of Tools and Equipment
Proper tool usage is essential for safe and effective servicing of the Eaton Endurant transmission; Specific tools like a 6mm hex for oil drain plugs and T45 Torx for LCA cap screws are required․ Ensure all tools are in good condition and calibrated to avoid damage or injury․ Use approved equipment for handling components like the MTM, which weighs approximately 40 lbs, to prevent accidents․ Always refer to the manual for torque specifications and special instructions․ Proper tool maintenance and adherence to guidelines ensure accurate repairs and longevity of the transmission․ This section underscores the importance of precision and safety in every servicing task․
2․3 OEM Guidelines for Vehicle System Operation
Adhering to OEM guidelines is critical for safe and effective operation of the Eaton Endurant transmission․ These guidelines ensure proper system integration and prevent potential damage․ Refer to OEM specifications for towing, as improper methods can damage components․ Always follow recommended pressure ranges (60-140 PSI) and avoid allowing the output shaft to rotate during towing․ Failure to comply may result in severe injury or component damage․ The manual provides detailed instructions for system operation, ensuring compatibility and performance․ Proper adherence to these guidelines is essential for maintaining vehicle safety and transmission longevity, as outlined in the service manual․ Always prioritize OEM recommendations for optimal results․

Installation and Integration
The Eaton Endurant service manual provides detailed installation and integration procedures for HD, XD, Pro, and UltraShift models․ It covers electrical and pneumatic system requirements, ensuring proper setup for optimal performance․ Follow OEM guidelines for transmission removal and installation to prevent damage․ Special tools and precautions are outlined to ensure safe and accurate integration․ Proper configuration of the Mechatronic Transmission Module (MTM) is essential for smooth operation․ Adhere to torque specifications and fluid recommendations for a successful installation․ Always refer to the manual for step-by-step instructions to guarantee proper integration and system functionality, ensuring long-term reliability and efficiency․
3․1 Installation Procedures for Endurant HD and XD Models
The installation of Eaton Endurant HD and XD models requires precise alignment of transmission components with the vehicle’s powertrain․ Begin by preparing the necessary tools and ensuring the vehicle is securely lifted․ Align the transmission’s input shaft with the engine’s pilot bearing, using a guide sleeve for accuracy․ Tighten the bellhousing bolts in a star pattern to avoid misalignment․ Connect electrical connectors to the Mechatronic Transmission Module (MTM) and ensure proper grounding․ For HD models, torque the bellhousing bolts to 24․5-29․5 Nm, while XD models require 34․7-40․4 Nm․ Always follow OEM guidelines for fluid filling and system priming to prevent air pockets․ Proper installation ensures smooth operation and longevity of the transmission․
3․2 Integration Requirements for Electrical and Pneumatic Systems
Proper integration of electrical and pneumatic systems is critical for the Eaton Endurant transmission’s operation․ Connect the wiring harness to the Mechatronic Transmission Module (MTM) and ensure all ground connections are secure․ Torque electrical connectors to 2․5-3․5 Nm to prevent damage․ For pneumatic systems, align the air supply lines with the transmission’s clutch actuator and ensure proper pressure settings (60-140 PSI)․ Refer to OEM guidelines for vehicle-specific electrical and pneumatic system requirements․ Incorrect integration may result in transmission malfunction or damage․ Always test system communication and fluid pressure before initial operation to ensure seamless functionality․
3․3 OEM Assembly Procedures for Endurant Transmissions
When assembling the Eaton Endurant transmission, strictly adhere to OEM guidelines to ensure proper alignment and functionality․ Start by aligning the rear housing with the main housing, ensuring all bolts are torqued to 50-60 ft-lb․ Install the MTM and TCM, ensuring all electrical connectors are securely fastened․ Torque MTM cap screws to 30-40 ft-lb, following the sequence outlined in the manual․ Properly align the clutch housing and input shaft, ensuring smooth engagement․ After assembly, test all electrical and pneumatic systems to confirm communication and fluid pressure․ Always refer to the OEM service manual for specific torque values and assembly sequences to avoid component damage․

Maintenance and Service
Regular maintenance ensures optimal performance and longevity of the Eaton Endurant transmission․ Follow scheduled checks for fluid levels, filter condition, and wear on components like clutch discs and bearings․
4․1 Scheduled Maintenance Requirements
Regular maintenance is crucial for ensuring the Eaton Endurant transmission operates efficiently․ The service manual outlines specific intervals for oil changes, filter inspections, and clutch adjustments․ Oil drain plugs should be serviced every 50,000 miles, with torque specifications between 18-22 lb-ft․ Fluid pressure sensors and output speed sensors require periodic checks to ensure accurate transmission performance․ Additionally, the manual recommends inspecting the clutch release yoke and actuator for wear every 100,000 miles․ Adhering to these schedules prevents premature wear and ensures optimal functionality․ Always refer to the manual for detailed procedures and torque specifications to avoid damage or injury․
4․2 Lubrication Specifications and Fluid Recommendations
The Eaton Endurant service manual specifies using approved transmission fluids, such as Eaton PS-386 or equivalent, to ensure optimal performance․ Fluid levels should be checked with the vehicle on a level surface and the transmission at operating temperature․ The oil drain plug, located at the bottom of the transmission, requires a 6 mm hex wrench and should be torqued to 18-22 lb-ft․ Over-torquing can damage the plug or housing․ Fluid replacements are recommended every 50,000 miles, with filters replaced every 100,000 miles․ Proper lubrication is critical for reducing wear and extending transmission life․
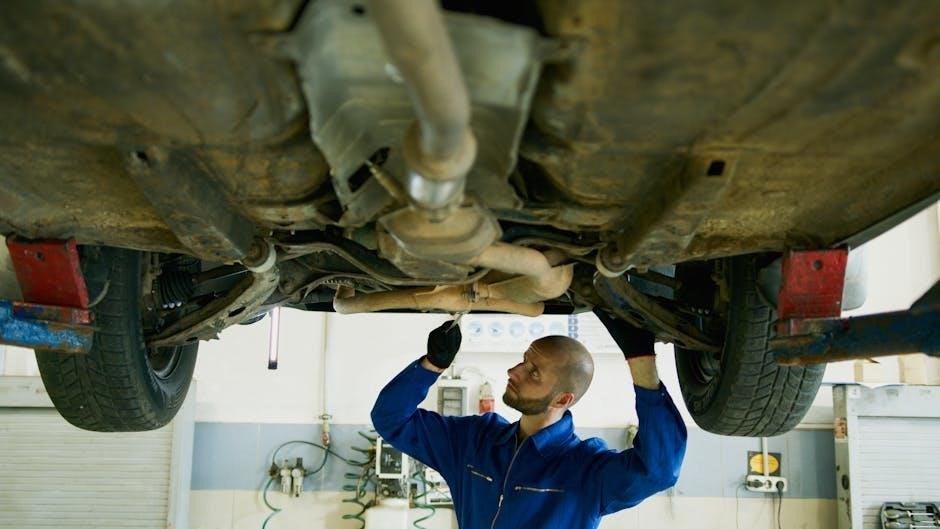
4․3 Oil Drain Procedure and Torque Specifications
The Eaton Endurant service manual outlines the oil drain procedure, emphasizing proper torque specifications to prevent damage․ The oil drain plug, located at the bottom of the transmission, requires a 6 mm hex wrench․ Loosen the plug slowly, allowing the fluid to drain completely․ Reinstall the plug and torque it to 18-22 lb-ft (24․5-29․5 Nm)․ Over-torquing can damage the plug or housing․ Always use the recommended transmission fluid, such as Eaton PS-386, and refer to the manual for specific intervals and guidelines to ensure optimal transmission performance and longevity․

Troubleshooting Common Issues
The Eaton Endurant service manual helps identify issues like gear slippage, erratic shifting, and fluid leaks․ It provides diagnostic tools and error codes for quick troubleshooting․
5․1 Identifying Common Problems like Gear Slippage and Erratic Shifting
The Eaton Endurant service manual highlights common issues such as gear slippage and erratic shifting, often caused by worn clutch packs or low fluid pressure․ Symptoms include unusual noises, delayed engagement, or rough transitions between gears․ The manual provides detailed diagnostic steps to identify these problems, including checking fluid levels, inspecting clutch components, and reviewing error codes from the transmission control module (TCM)․ Technicians can use ServiceRanger to retrieve diagnostic trouble codes and perform system tests․ Early detection of these issues helps prevent major damage and ensures smooth transmission operation․ Proper troubleshooting is essential for maintaining optimal performance and longevity․
5․2 Diagnostic Tools and Error Codes
The Eaton Endurant service manual provides advanced diagnostic tools and error codes to identify transmission issues accurately․ ServiceRanger software is a key tool for retrieving diagnostic trouble codes and performing system tests․ The manual also covers fluid pressure sensor (FPS) and output speed sensor (OSS) diagnostics, which help detect problems like low fluid pressure or incorrect gear ratio readings․ Error codes are categorized to pinpoint malfunctions, such as clutch pack wear or solenoid failures․ By using these tools, technicians can quickly diagnose issues, ensuring efficient repairs and minimizing downtime․ Proper use of diagnostic tools is essential for maintaining transmission health and performance․
5․3 Resolving Fluid Leaks and Pressure Sensor Issues
Fluid leaks and pressure sensor issues are common challenges addressed in the Eaton Endurant service manual․ Fluid leaks often occur at connection points or seals, requiring inspection and tightening to specified torque values․ For pressure sensor problems, the manual outlines procedures for testing and replacing faulty sensors․ Disconnecting the battery before servicing and using ServiceRanger for diagnostic checks are recommended․ Proper calibration and alignment of sensors ensure accurate pressure readings․ Always refer to OEM guidelines to avoid over-torquing, which can damage components․ Replacing worn seals and verifying fluid levels are also critical steps to resolve leaks effectively and maintain transmission performance․

Repair and Replacement Procedures
This section details step-by-step procedures for transmission removal, MTM configuration, and TCM replacement․ It also covers clutch and release bearing replacement, ensuring proper torque specifications and component protection․
6․1 Transmission Removal and Reinstallation Steps
Transmission removal requires draining fluids, disconnecting electrical and pneumatic connections, and safely lifting the unit․ Follow OEM guidelines for proper venting and component protection․ Reinstallation involves aligning the transmission with the engine, securing it with specified torque, and reconnecting all systems․ Ensure all cap screws are tightened to recommended torque specifications to prevent damage․ Refer to the manual for detailed steps to avoid component misalignment or fluid contamination during reassembly․ Proper reinstallation ensures optimal performance and longevity of the Eaton Endurant transmission system․
6․2 Mechatronic Transmission Module (MTM) Removal and Configuration
Removing the MTM involves disconnecting the output speed sensor harness and removing cap screws․ Handle with care as it weighs approximately 40 lbs․ Post-removal, inspect and clean the MTM housing․ Configuration requires connecting to ServiceRanger software for calibration and testing communication with the TCM․ Ensure all electrical connections are secure to prevent malfunctions․ Follow torque specifications for reinstallation to maintain system integrity․ Proper configuration ensures seamless transmission control and optimal performance, aligning with Eaton’s standards for durability and efficiency․
6․3 Transmission Control Module (TCM) Replacement and Programming
Replacing the TCM requires disconnecting the negative battery cable to prevent damage․ Remove the TCM cover nuts and lift the module from the MTM․ Transfer the TCM seal to the new unit․ Use ServiceRanger software to program the TCM, ensuring proper communication with the MTM․ After installation, reconnect the battery and test all systems․ Follow OEM guidelines for initialization and calibration․ Proper programming ensures seamless transmission operation, maintaining performance and reliability․ Always refer to the service manual for specific torque and connection details to avoid errors during the process․
6․4 Clutch and Release Bearing Replacement
Clutch and release bearing replacement involves removing the clutch cover and driven disc assembly․ Inspect the flywheel and replace the pilot bearing if necessary․ Use a 15 mm socket to remove the clutch cover cap screws․ Carefully pull the clutch assembly away from the flywheel․ Replace the release bearing by sliding it off the input shaft․ Inspect the clutch release yoke sockets for damage․ Reinstall components in reverse order, ensuring proper alignment․ Torque clutch cover bolts to 41-51 Nm․ Always use jack stands and consult torque specifications to avoid damage or injury․

Diagnostics and Testing
The Eaton Endurant Service Manual provides detailed diagnostic procedures using ServiceRanger, FPS, and OSS tools for troubleshooting․ It ensures accurate issue identification and proper system functionality․
7․1 Using ServiceRanger for Diagnostic Procedures
ServiceRanger is a diagnostic tool designed for Eaton Endurant transmissions, enabling technicians to identify and resolve issues efficiently․ It provides real-time data monitoring, error code analysis, and detailed troubleshooting guides․ To use ServiceRanger, connect it to the transmission’s diagnostic port and launch the software․ Create a Service Activity Report to document findings and perform tests․ The tool also supports TCM replacement and configuration, ensuring proper transmission functionality․ Follow on-screen instructions for step-by-step diagnostics, and refer to the manual for specific procedures․ Proper use of ServiceRanger helps maintain transmission health and prevents potential damage․
7․2 Fluid Pressure Sensor (FPS) and Output Speed Sensor (OSS) Diagnostics
The Fluid Pressure Sensor (FPS) and Output Speed Sensor (OSS) are critical components in the Eaton Endurant transmission system․ The FPS monitors hydraulic pressure, ensuring proper clutch and gear engagement, while the OSS tracks transmission output speed for accurate gear shifting․ Diagnostics involve verifying sensor accuracy and checking connections․ Use ServiceRanger to read FPS and OSS data, identifying deviations from set parameters․ If malfunctions occur, refer to the service manual for removal and replacement procedures․ Proper sensor function is essential for transmission performance and reliability, ensuring smooth operation and preventing potential damage․
7․3 MTM and TCM Communication Tests
Communication between the Mechatronic Transmission Module (MTM) and Transmission Control Module (TCM) is vital for seamless transmission operation․ To ensure proper interaction, perform communication tests using ServiceRanger․ This involves checking data transmission integrity, verifying module connections, and ensuring no error codes are present․ If communication issues arise, refer to the service manual for troubleshooting steps, such as reinitializing the modules or replacing faulty components․ Proper MTM and TCM communication ensures accurate gear shifting, optimal performance, and prevents system malfunctions, maintaining the transmission’s reliability and efficiency in all operating conditions․ Regular testing is recommended to uphold system functionality․

Transmission Removal and Disassembly
Transmission removal involves disconnecting components like the MTM and TCM, following detailed procedures to ensure safe disassembly and component protection, as outlined in the manual․
8․1 Step-by-Step Guide for Transmission Removal
The Eaton Endurant Service Manual provides a detailed, step-by-step guide for transmission removal․ Begin by draining fluids and disconnecting electrical connectors, then remove mounting bolts and components․ Use specialized tools like a transmission jack for safe handling․ Always refer to OEM guidelines to avoid damage․ Follow proper disassembly procedures to protect components during removal․ Ensure the vehicle is securely supported and all safety precautions are observed․ This guide ensures a systematic approach to transmission removal, minimizing risks and ensuring efficient servicing․ Proper documentation and labeling of components are crucial for reinstallation․ Adhere strictly to the manual to prevent damage or injury․
8․2 Disassembly of the Rear Housing and Clutch Housing
Disassembling the rear housing and clutch housing requires careful attention to detail․ Start by removing the cap screws using a T45 Torx wrench for the LCA cap screws․ Gently pull the housing away from the transmission, ensuring no components are forced․ Disconnect the harness connectors and remove retaining clips․ Inspect the release yoke and clutch bearings for wear․ Document each step for proper reassembly․ Use specialized tools to avoid damaging components․ Always refer to the service manual for specific torque specifications and precautions․ Proper disassembly ensures safe handling and prevents damage to critical transmission parts․
8․3 Special Instructions for Component Identification and Handling
When disassembling, identify components carefully to avoid damage․ Use torque wrenches for precise bolt removal, ensuring adherence to specified values․ Handle the Mechatronic Transmission Module (MTM) with caution, as it weighs approximately 40 lbs and contains sensitive electronics․ Refer to OEM guidelines for specific part removal sequences․ Label and organize components to facilitate proper reassembly․ Always use approved tools to prevent damage to critical parts like sensors and bearings․ For HD and XD models, note unique torque specifications and handling instructions to maintain component integrity and ensure safe servicing․ Proper handling prevents costly repairs and ensures transmission longevity;

Clutch Removal and Inspection
Remove the clutch cover and driven disc assembly for inspection․ Check for wear, damage, or misalignment․ Ensure proper torque specifications are applied during reinstallation to maintain performance and longevity․
9․1 Clutch Housing Disassembly and Component Identification
Disassemble the clutch housing by removing the cap screws and carefully pulling the housing away․ Identify components such as the driven disc assembly, flywheel, and release bearing․ Use specialized tools like T45 Torx for LCA cap screws․ Inspect the release yoke socket for damage and ensure proper alignment․ Note any wear or damage on the clutch components․ Special instructions emphasize handling with care to avoid damage․ Proper torque specifications must be followed during reassembly to ensure optimal performance and prevent premature wear․ Always refer to OEM guidelines for precise component identification and handling procedures․
9․2 Inspection of the Driven Disc Assembly and Flywheel
Inspect the driven disc assembly for wear, scoring, or cracks․ Check the flywheel for excessive wear, scoring, or cracks, ensuring proper surface finish․ Verify the pilot bearing is seated correctly and not damaged․ Measure the flywheel for runout using a dial indicator․ Inspect the driven disc facings for glazing or uneven wear․ Replace any components showing excessive wear or damage․ Use certified tools for accurate measurements․ Follow OEM guidelines for acceptable wear limits to ensure reliable operation and prevent premature failure․ Proper inspection ensures optimal clutch performance and prevents costly repairs․ Record all findings for future reference․
9․3 Special Tools and Precautions for Clutch Removal
Clutch removal requires specialized tools, such as a clutch puller, dial indicator, and torque wrench․ Always wear protective gear, including gloves and safety glasses․ Ensure the vehicle is securely lifted and supported with jack stands․ Disconnect the battery to prevent accidental start-up․ Use a pilot bearing puller for safe removal․ Avoid using impact tools, as they may damage components․ Follow torque specifications for bolts to prevent stripping․ Inspect tools for damage before use․ Keep work area clean and well-lit․ Refer to OEM guidelines for specific tool requirements․ Proper precautions ensure safety and prevent transmission damage during clutch servicing․
Additional Resources and References
Access additional resources, including PDF manuals, troubleshooting guides, and service parts information, on the official Eaton website․ Technical support and assistance are also available for further inquiries․
10․1 Downloading PDF Manuals for Endurant Models
Digital versions of the Eaton Endurant service manual are available for download in PDF format, covering HD, XD, Pro, and UltraShift PLUS models․ These manuals provide detailed installation, maintenance, and repair procedures, ensuring optimal performance․ They are accessible in both English and Spanish, catering to a broader audience․ The manuals include sections on troubleshooting, lubrication specifications, and torque requirements․ Users can find these resources on the official Eaton website or platforms like manualslib․com․ Downloading the PDF ensures easy access to essential information for servicing Eaton transmissions efficiently․
10․2 Accessing Troubleshooting Guides and Service Parts Information
Troubleshooting guides and service parts information for Eaton Endurant models are readily available online․ These resources help diagnose issues like gear slippage and fluid leaks, providing detailed error codes and repair steps․ The manuals include lists of required tools and parts, ensuring efficient servicing․ Users can access these guides through the official Eaton website or platforms like manualslib․com․ Additionally, ServiceRanger software offers advanced diagnostic tools for pinpointing malfunctions and ordering genuine Eaton parts․ This comprehensive support ensures technicians can resolve issues quickly, maintaining transmission performance and longevity․
10․3 Manufacturer Support and Technical Assistance
Eaton provides extensive manufacturer support and technical assistance for Endurant transmission servicing․ Technicians can access 24/7 support through Eaton’s official website, including phone and email assistance․ The website offers downloadable resources, such as troubleshooting guides and service parts catalogs․ Additionally, Eaton’s ServiceRanger diagnostic tool simplifies repairs by providing real-time data and repair instructions․ Certified service centers and training programs ensure technicians are well-equipped to handle complex procedures․ Genuine Eaton parts and expert guidance are readily available, minimizing downtime and ensuring adherence to OEM standards for optimal transmission performance and longevity․
The Eaton Endurant Service Manual is a vital resource for technicians, covering installation, maintenance, and repair for HD, XD, Pro, and UltraShift models, ensuring optimal performance and longevity․
11․1 Summary of Key Service Manual Highlights
The Eaton Endurant Service Manual provides essential guidance for technicians and operators, covering installation, maintenance, and repair procedures for HD, XD, Pro, and UltraShift models․ It includes detailed diagnostic tools, troubleshooting steps, and best practices for ensuring transmission longevity․ The manual emphasizes proper lubrication, fluid specifications, and torque requirements to maintain optimal performance․ Additionally, it offers step-by-step instructions for transmission removal, MTM configuration, and clutch replacement․ By following the manual’s guidelines, users can ensure safe and efficient servicing, minimizing downtime and extending the lifespan of the Eaton Endurant transmission․
11․2 Best Practices for Ensuring Transmission Longevity
Adhering to the Eaton Endurant Service Manual’s recommendations is crucial for extending transmission life․ Regular lubrication checks, fluid changes, and torque specifications ensure smooth operation․ Proper installation and integration of electrical and pneumatic systems prevent premature wear․ Technicians should follow OEM guidelines for vehicle system operation and use specialized tools for clutch and MTM replacements․ Scheduled maintenance, diagnostic checks with ServiceRanger, and prompt resolution of fluid leaks or sensor issues are vital․ By prioritizing these practices, operators can maintain peak performance, reduce repair costs, and ensure the endurance of their Eaton Endurant transmission․
11․3 Final Tips for Safe and Effective Servicing
Always wear personal protective equipment and ensure the vehicle is on level ground with the parking brake engaged․ Refer to the Eaton Endurant Service Manual for specific instructions and torque specifications․ Use genuine Eaton parts to maintain transmission integrity and performance․ Keep the work area clean and well-lit to minimize risks․ Follow proper fluid disposal guidelines to protect the environment․ Regularly inspect tools and equipment for damage or wear․ By adhering to these practices, technicians can ensure safe, efficient, and effective servicing of the Eaton Endurant transmission․